Professionals involved in web development around the world usually rely on local development servers, popularly known as “localhost“, (Xampp, Lampp, Wamp, Local by Flywheel, etc.) installed on their computers for website development. After all the development work is done, they set up the website from localhost to their server. And, through this, they make their website open for everyone’s use in the online world.
In this guide, I shall try to show you how to set up a website developed from localhost to an online server from localhost by following step by step. I assume that the development work of your website is completely over.
Without further ado, let’s take a look at the process of how to move a Joomla website from a local development environment to an online server.
Common steps to transfer Joomla! site from the local site to the online server
The steps of site transfer are as follows at a glance:
- Create a compressed .zip file with all the files in the root folder of your website on the localhost server.
- The zip file of the website needs to be uploaded to the root folder on the server. An FTP client software (e.g., FileZilla) can be used for this purpose. Alternatively, cPanel‘s file manager can be used by logging in to the hosting server.
- Exporting your Joomla site database using localhost’s phpMyAdmin.
- Importing the localhost Joomla database using the online server’s phpMyAdmin.
- Now, Open the Joomla configuration.php file in the root folder and set the correct value of the required properties.
- Test online to see if the site looks consistent with the design.
Following the guidelines of this tutorial will make it easier to transfer a Joomla website from a “localhost” to an online server. And, by following these same steps, you can transfer a Joomla website between two online servers.
The steps outlined in this tutorial are presented quite simply. However, this work can be done smoothly if you know the technical aspects of it in advance.
First: Create a Compressed .zip File
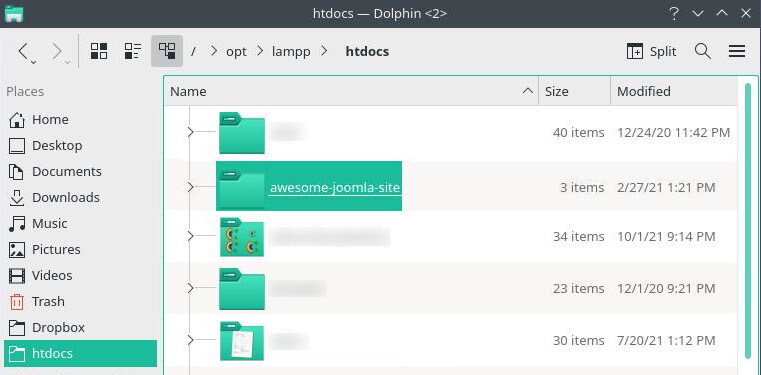
In the first step, I will create a compressed .zip file with all the files in the folder in which I created the Joomla! site in my localhost. Suppose my file name is awesome-Joomla-site.zip file.
In Windows Operating System, the root folder of the localhost is in the C:\\Xampp\htdocs folder. For Linux, it can be found in the /opt/lampp/htdocs folder.
Second: Upload the Website’s zip File to the Server’s Root Folder
Now I have the .zip file of my entire site. Now it’s time to upload this file to the server. Uploading site files in .zip format can result in relatively faster file transfers. Uploading each file one by one requires a lot, much more time than that.
I will now discuss how to upload files using FTP client software and cPanel’s File Manager.
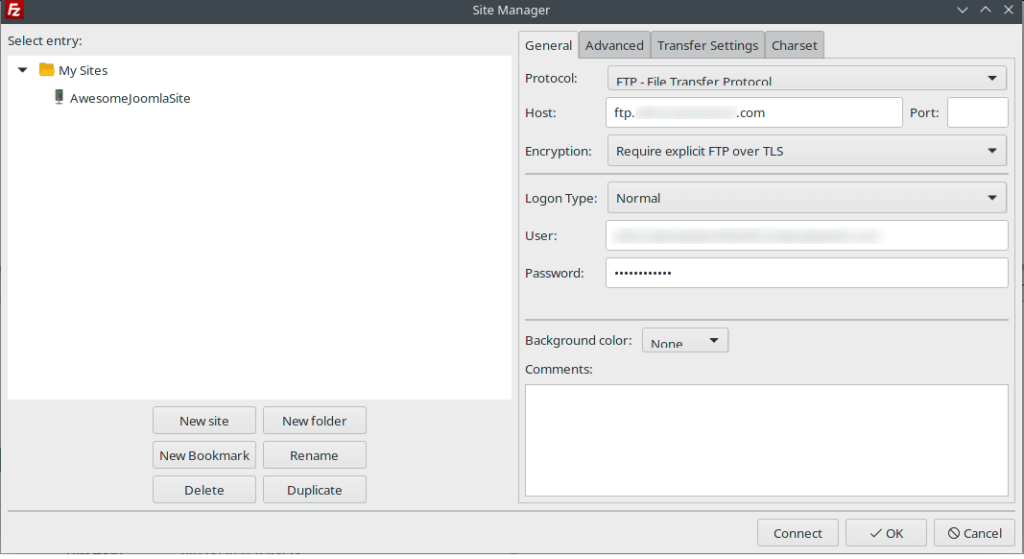
File transfer using FTP
To use an FTP client, I first need to know some information about it. But, where can I get the details of FTP settings? cPanel-based web hosting is widely popular among site owners and web developers. When anyone buys a cPanel-based hosting package, the hosting company provides all the information about the hosting via email. It also contains FTP information.
The following two pieces of information are required to communicate with the online server via FTP:
- FTP Address: Usually the address looks a lot like this: ftp.yourdomain.com
- FTP Login Details: The username and password associated with the FTP protocol
And, for this, I need FTP client software. I mainly use FileZilla. I have already downloaded and installed the FTP client and connected to the server using the FTP login information.
The section for storing login information in FileZilla looks like this:
With an established connection to my Joomla server, I have uploaded the .zip file to the remote server. Usually, the remote server root folder is in the “public_html” or “www” folder. There are two panels in FileZilla, a left panel and a right panel. The left panel points to localhost and the right panel point to the remote server.
To start the transfer, I first selected my files in the left panel and drag them to the left panel in FileZilla, and release the files. This will start the transfer of all your Joomla files to your server.
One thing to keep in mind here. If I don’t create a .zip file, I need to upload all the files on my Joomla! site one by one. A Joomla! 3 has about 13,000 files.
However, if I upload a .zip file from my site to the server, I need to decompress this .zip file again. In this case, I will log in to cPanel and use the file manager to go into the public_html folder and do this decompression.
Transfer Files using cPanel’s File Manager
If your hosting is using cPanel, you can perform the transfer in a much faster way. Please note that some hosting company offers proprietary File Manager to their clients.
- Upload the file directly from the File Manager to the root folder (public_html folder) of the server.
- Decompress the .zip file, so that you get a copy of the files identical to my localhost.
If you want to Transfer the WordPress site from Localhost to Server,
I have written a separate guideline for it.
Third: Export from localhost in the Server using phpMyAdmin
The next step is to export and import the database. This consists of two steps:
- Exporting your current local database
- Importing the exported database to the MySQL database on the hosting company’s server
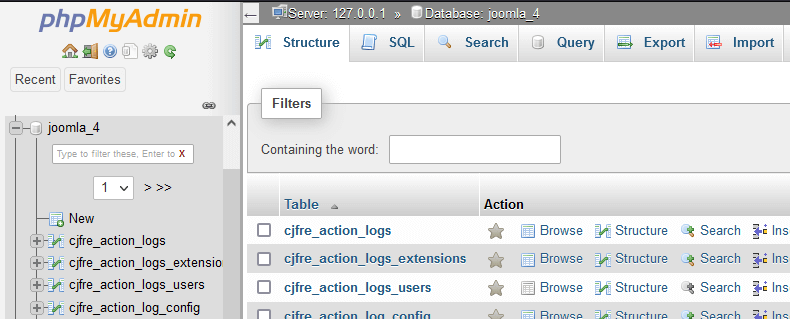
Export the Joomla! database from localhost phpMyAdmin
To export my current database, I use phpMyAdmin which comes bundled with Lampp (in Linux) when installed on my personal computer. In Windows Operating System, it is called Xampp.
I can access phpMyAdmin using a browser. The URL is, generally, http://phpmyadmin.
From phpMyAdmin Admin Panel, I select my database and click on it. I hit the Export button, which opens up a new page. Here, I have deliberately changed Export Method to “Custom – display all possible options” and the “Compression” method to “zipped” and click the “OK” button to download my Joomla! database on the Desktop.
phpMyAdmin returns the database file in the .zip format of my Joomla! website along with site contents, settings, and meta information.
Note:
With the default settings of phpMyAdmin, the “Add CREATE DATABASE / USE statement” option is unchecked. Make sure, this option remains unchecked. The database should be created manually.
Fourth: Import to the Server’s MySQL Database
In this step, I will import my Joomla database to the online server.

However, before that, I will create a database by clicking on the “MySQL® Databases” link from cPanel.

At the same time, I shall create a new username and set a strong password for it.
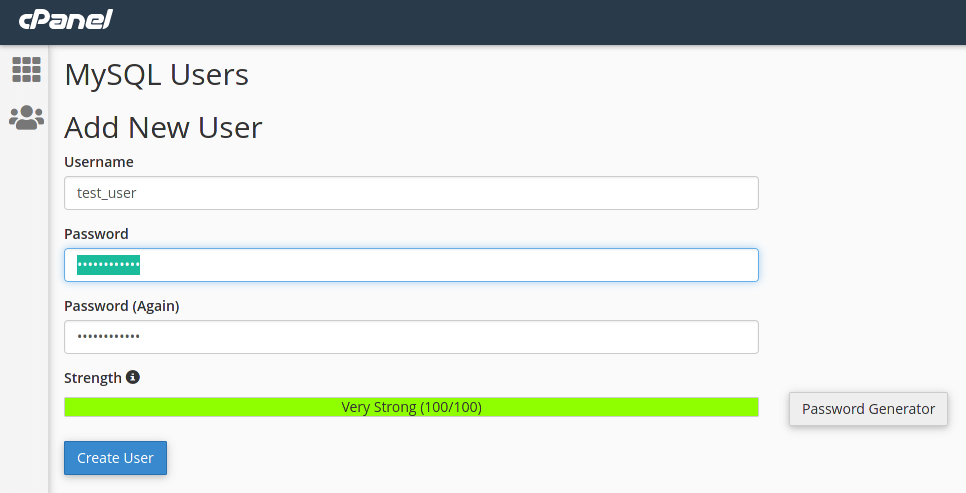
We will need the name, username, and password information of this database later. I will set this information as the value of $db, $user, and $password in Joomla!’s configuration.php file.
In addition, the hosting company will specify in their emails what to put in the Joomla site configuration for the value of that $host (localhost, or, IP Address).
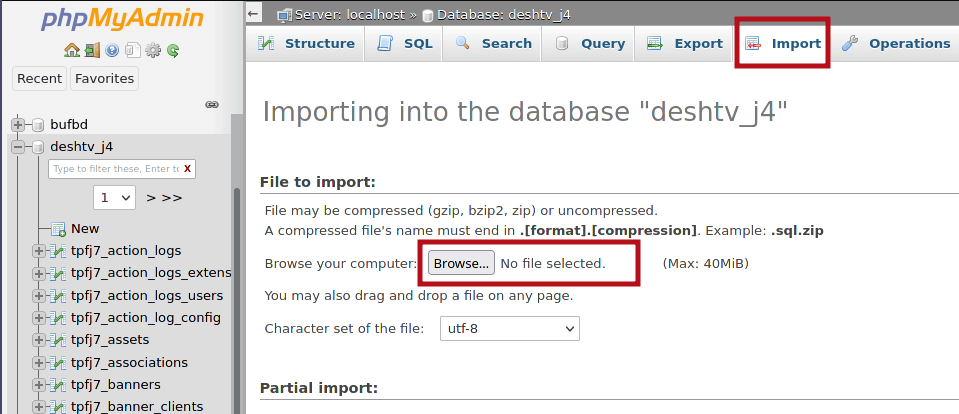
I will open the corresponding page by clicking on the phpMyAdmin link from cPanel.
This page has two panels on the left and right. On the left is a list of all my database names created from cPanel. Clicking on the name of my Joomla site database from this list will show the details of the corresponding database in the panel on the right.
Now, I will click on the “Import” button from the menu bar at the top of the right-hand panel. I will press the Browse… button on the Import page. After pressing the button, the File Upload dialog box will appear. I will select the .zip file of my localhost and click on the Open button.
Now, at the bottom of the Import page, I will press the OK button.
As a result, phpMyAdmin will upload my .zip file and set up all the tables in my database and all the rows in each table.
Importing a database is a straightforward task. Still, for newcomers, the task may seem daunting. In this case, if you ask the hosting company’s support team for help in this work, they will gladly do it, I hope. The support team will ask you for the .zip file of the database.
Fifth: Updating the Joomla! configuration.php File
The Joomla! configuration.php file contains various Joomla settings, such as host address, database name, username and password, temporary and log file physical address (path), etc. Currently, the setting values of the localhost remain in the server’s Joomla configuration file. These need to be replaced with values that are compatible with the server.
- Navigate to your live server’s Joomla! installation folder which is located in the root folder “public_html”, in my case.
- Find the configuration.php file.
- Edit / check the following lines:
// usually, 'localhost', or '172.0.0.1'
public $host = 'localhost';
// change it to the new database username
public $user = 'root';
// enter the new database password
public $password = '';
// change it to your live server database name
public $db = 'joomla_db_name';
- I also need to edit the path for logs and tmp directory by finding the following lines:
public $log_path = 'C:\Xampp\htdocs\joomla\administrator\logs';
public $tmp_path = 'C:\Xampp\htdocs\joomla\tmp';
In these two lines, I will write the value of the path address compatible with my server for $log_path and $tmp_path.
Let’s save the changes that we have made in the configuration.php file so far. Now, I will close the file.
We’ve told Joomla exactly where to find the site’s database, and where its log and tmp folders are. Usually, changing these few settings will get your Joomla site ready to display properly in the browser. Now, if you go to the address bar of the browser and type the URL of your site, and press Enter key, then you should see the site on the screen, hopefully.
Sixth: Test the live site so that the site looks consistent with the design
If your site’s assets, such as CSS, JS, and Image, load properly, they will display in the browser exactly matching the design.
If the assets do not load properly, you need to open the browser’s “Inspection Tool” by pressing the F12 key to check the path of the assets, to see if there are any errors. In particular, if the path to the images is hard-coded to the localhost’s path in the address, they will not display on the live server.
So, without panicking about this kind of error, debugging in the cold head, errors can be corrected.
If your site looks just right in the browser, congratulations! You have completed the transfer of a Joomla site from localhost to server.
Technical support for site transfers
In this tutorial, I have tried to show you how to set up a Joomla site on a server from a localhost development environment. If you think that creating a website with WordPress or Joomla and setting up the site on a server is going to be a “technical” thing for you, then let us consider hiring.
Leave Your Comment