What is Git
Git is a version control system. Usually, developers use Git for version control of any project. Git enables multiple developers to work on the same project. Software companies control large projects with Git.
What is GitHub
GitHub is a site for hosting codes. Usually, open-source projects are hosted on GitHub and shared with other developers. By using GitHub, anyone can work on any project, from anywhere in the world.
Ever used (Ctrl + Z) while writing in Microsoft Word? If you make a mistake during work time, you can fix it and return to the previous state. This feature is available when creating a project using Git. Suppose, we have added many features to a project. But, my computer doesn’t save my newly added features; it won’t even remember the date and time of those feature inclusions.
In course of writing the code, we felt that the feature I had added three days ago was a good one. Meanwhile, the current codes are bad and problematic. Now, you want to go back to the earlier code, how can you do that? Who wrote which pieces of code? Which code follows which? – How can these be managed? Git is the only way to solve such problems.
Git Installation
Here, we will learn how to install Git: a basic Git command. Then, we shall learn how to upload or push a project to GitHub with Git; how to clone a project, and so on.
Download Git for windows from the link below. Then install. Mac or Linux can also be downloaded from the link below.
After installing Git, you need to go to the path setting and add the Git path. For example, “C:\Program Files (x86)\Git\cmd“.
Click on System from Control Panel. Click on the Advance System setting from System. Then click on Environment Variable. From here, you need to click on the path from User Variable and edit.
Control Panel > System>Advance System setting > Environment Variable
And add the cmd path of the Git. To check if the path is set correctly, open the command line and type “Git“. If Git shows information about itself, then you can understand that the Git path is set correctly.
After installing Git we need to set the email and name. For that you have to enter the following two commands:
git config --global user.name "Your Name"
git config --global user.email"Your Email"
If you want to see if the user name and email have been set up correctly, go to the command line or terminal and enter the following commands:
git config --global user.name
git config --global user.email
Sign up for a GitHub Account
If you don’t already sign up for a GitHub account, you can make one here.
Push a project to GitHub
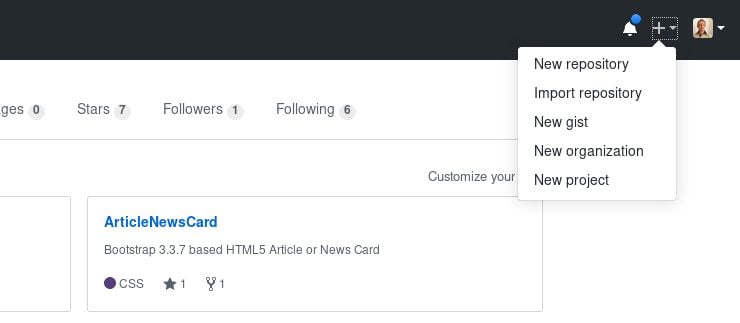
Now, we are going to create a project and upload it to GitHub (GitHub.com). First, open an account on GitHub for that. Then, after opening, log in to the account. Click on the + sign and click on “New Repository”.
Good to say, Git and GitHub are two different things. One is the version control system. Another is hosting. GitHub hosts Git projects.
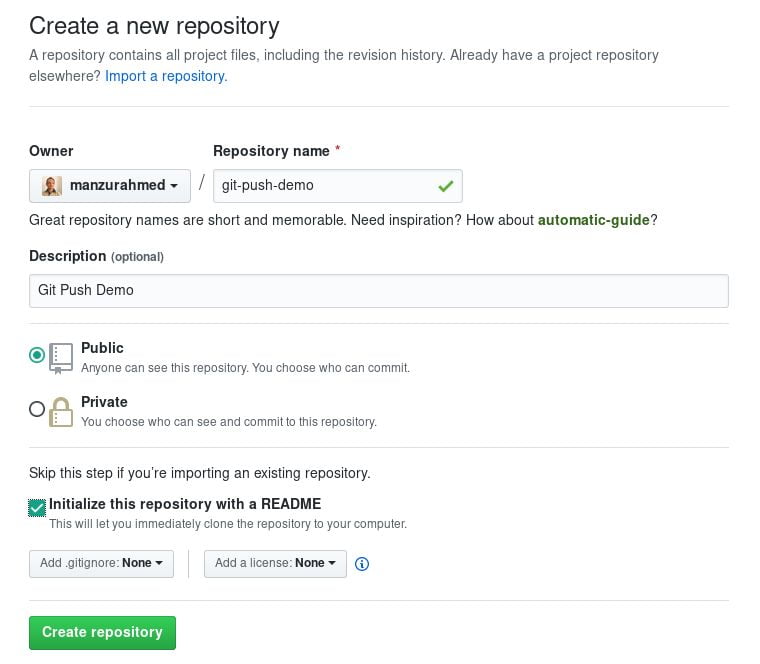
Next, I’ll create a repository with a convenient name.
After creating the repository, I will show you the Git commands of how we can push a project. Do the following:
Now, we will create a project that we will push/upload to GitHub. First. let’s create a folder on the desktop called “Git-push-demo”. Let’s create a file inside this folder and open it and write any code in the file. C, Java, C ++, PHP, C # – whatever you want. I’ll just create an HTML file as a demo. Name it, index.html. Just writing “<h1>Hello World!</h1>” inside it. Following the same principle, we can upload any project we want.
<h1>Hello World!</h1>
We need to initialize the Git in the Git-push-demo folder. I’ll go to the command line for that. Then change the directory and come to Git-push-demo. For that we have to write:
cd git-push-demo
Next, I shall write the following code to initialize Git:
git init
Then, a local Git repository will be created in our Git-push-demo folder. This time, our task is to add our project files to this repository. For that, I’ll write:
git add .
“git add .” – means adding all the files to the Git repository. Since there is only one file in our project, only one will be added.
adding the file, I will commit. I’ll write like the following:
git commit -m "first commit"
Now we are ready to push this project to GitHub. The location we push on GitHub is called Remote Repository. To push the remote from the local repository, we need to first add the URL of the remote repository. I will get one URL for each GitHub project. For example, the URL of our Git-push-demo is https://github.com/manzurahmed/git-push-demo.git. “manzurahmed” is my username. To add a remote repository, type,
git remote add origin https://github.com/manzurahmed/git-push-demo.git
Then I will push it by typing,
git push -u origin master
Now, it will ask for your GitHub username. Then, the password. Then, press Enter to upload our project to GitHub. When it’s all done, a “success” message will appear.
And if you go to GitHub and check the repository, you will see our project.
There was only one file in our project, index.html, we can see only that file.
It is very important to know how to use Git to work on a large project on your own or with a team. Only the basic usage of Git is shown above. We have seen how to create a Git repo, commit to Git, how we can push a project in GitHub, etc.
Suppose, we have accidentally deleted the project on our local PC, which may be on the desktop. Since our project is available on GitHub, we can easily download it from GitHub. The project can be downloaded in zip format. We can clone it with Git if we want. Then a copy of our project will be made locally:
git clone https://github.com/manzurahmed/git-push-demo.git
One more thing! You also need to know about “pull“.
“Pull” is used to download a project from the server to your own folder or to update your local project.
git pull https://github.com/manzurahmed/git-push-demo.git
Now suppose we have done some excess work. We do not want to commit those actions. We can write to eliminate these tasks with the help of the Git command.
git stash
We can use the above-mentioned command to remove it after we accidentally write anything excessively.
Git Branching and Merging
The above functions of Git are quite simple. When a developer works on a project, the above commands are usually more used. However, working on a team requires a few more commands. Because, when we work on a team, many developers work together on the same project. It can be seen that each person is assigned to work on a number of features. And that’s where Branch’s idea came from. One person works at one branch.
Once a feature’s work is completed, everything has to be linked back to the original project. It’s called Merge.
To create a new branch, write:
git branch branch_name
I’m giving a simple idea for a project. Well, if we’re building a website, one works with the “home” page, and the other works with the “about” page. Then, whoever works with the “home” page, will create a branch called “home”. And whoever works with “about”, will create a branch called “about”
In Git, there is a default branch which is called, “master”. After creating a new branch, we have to switch from the master branch to the new branch. After creating the new branch, you have to write the following to switch to that branch,
git checkout branch_name
One developer can work on the same file by making a branch. For example, the “home” page is very complex to code in a project. Someone is dealing with the “menu” section, while another developer is assigned to work with the “sidebar”. Now, these two developers have to work on the same file. For this, they will make two brunches, such as “menus” and “sidebar”. If two people are at two branches, no one will see each other’s code. Then once we have merged the two brunches, the menu and the sidebar will become one.
Once the developers have finished developing the “home” and “about” pages, or the “menu” and “sidebar” are finished, we will merge the branches.
Let us merge branches,
git merge branch_name
For example, we will merge the home branch first with the master branch. For that, I will go to the master branch first, and write Git checkout master. Then I’ll write,
Git merge home
Then again merge the “about” branch with the “master” branch.
For that, we will write,
git merge about
Then, all our work will be merged with the master. This way we can create as many branches as we want in a project. To view branch listings,
git branch
A star sign will show up next to the branch we’re at. To know what status or branch I am in,
git status
Thus, we wrap up working with a branch. After merging with the original project, we can delete one branch if desired. In order to delete a branch, write,
git branch -d branch_name
For example, to delete the “about” branch, I shall issue the following command,
git branch -d about
If we upload our project to GitHub or any other remote site, and if we want to delete our branch from that remote site, we need to write,
git push origin --delete branch_name
or
git push origin : branch_name
Resources to learn Git Branching
If you are curious about the details of Git Branching, the learnGitbranching website is a good resource. This website provides detailed learning about Git Branching in an interactive way. It’s free.
GitHub is a public Git Project host. If we work on a secret project, where do we host projects? Yes, there are private Git Project hosts for that. Private repositories can be created in GitHub as well. He has to pay dollars on monthly basis. There are many free private repositories, bitbucket is one of them.
You can create a private repository here. You can add your own team. There are many features to work with bitbucket.
Resources to learn Git
Many complex projects can be managed with Git. But, you have to learn, right? Git Learning can be started from the link below,
Search Google for many more tutorials. Gradually, a good skill will be acquired. Then you won’t be creating any project without Git.
Knowing these, you can work on almost any large project. To find out more about Git branching and merging, you can learn from the sites of your choice by searching Google or the following two,
In addition, if you find it difficult to use a terminal or command line, you can use SourceTree.
The commands required for Git can be easily learned from “Try Git“.
Leave Your Comment