Every website or application has two parts. One is the front end and the other is the back end. The front end is the user interface, which you see in your mobile application or browser. And the back end is its brain, which you can’t see, but can perceive.
All the logic of the user interface is in the back end. In a word, your brain instructs you, when to do what; Similarly, a website or software is directed back-end. This back-end determines when to show what on a website or application. Hopefully, you have some ideas about the back-end and front-end. And if I still can’t get a good idea about this, then there’s no reason to worry. If you stay with NodeJS, you will understand everything slowly.
Many people can face errors or problems while learning NodeJS, so never sit down with the problem. The more you sit with the problem, the more the problem will surround you. So when you face the problem, search on Google, GitHub, and StackOverflow, because you are not the first person to fall into this problem. Many developers before you have had this problem and experienced developers on these sites have come up with solutions. You should find a solution to your problem from there.
There are so many twists! Are you ready to learn Node JS now? If so, the first thing you need to do is install Node.js on your PC. To download Node.js, launch your favorite browser and browse the official website of Node.js.

After visiting the official website of NodeJS, you will see 2 versions. One is the LTS (Long-Term Support) version; Another is the current version. You will download and install the LTS version on your PC.
Want to check if NodeJS is installed correctly? However, open cmd or git bash of your PC, type the following command, and press enter.
node -v
If the output shows the version of the node, then 100% sure that the node is installed on your PC. It will look like the screenshot below.

Our first step is done. The second step is that we will need a good code editor to write the code. I highly recommend you use Visual Studio Code. Because it’s free and user-friendly. In addition to this editor, Sublime Text 3 can be used. You can use any editor you want. Download and install it from the official website of VSCode.
Now then we can start working; Because our development environment setup has been completed.
What is Node Module System?
Today we will learn what is Node Module System! To better understand Node.js, we need to have a clear idea of its Module System. So, in this tutorial, I will focus on what Node Module System is, why I will use it, and how this module system works.
We know that JavaScript was created for browsers only and was intended to make a webpage interactive. But, now we can do a lot from the beginning by creating a server with JavaScript through nodes. Note that although JavaScript is used in both places, there are some differences between them. The browser works with the window object and node.js works with the global object.
The object of the window object is to work with the browser, and the object of the global object is to work with the file system, that is, what operating system you are using, how many GB of RAM is installed on your PC, also, node.js can know all the information. . Window objects, on the other hand, do not have this kind of direct power, to say the least.
So, what is the essence? Node.js does not have a window object, but node.js has a global object.
It’s time to code and try to code with me. Remember that no matter how much you follow the tutorial, if you do not try to do it yourself, you will soon forget it. And if you practice it right away, it will stick in your head for many years.
Anyway, first I will create a folder named node-module-test. However, you can use any name. Then I will create a file in that folder called app.js. However, the extension of the file must be “.js“.
Then, we will open this folder with Visual Studio Code. After opening, we can write code in app.js. To maintain the tradition, we can start writing code with “Hello World”.
console.log('Hello World!');
We need to run a command to run the code in app.js. “node (space) The name of the file”. So, we need to type the following command:
node app.js
In this tutorial, I am using the integrated terminal of VSCode and I will use it throughout the tutorial, pressing CTRL + ` (backtick) will open the integrated terminal of VSCode.
After giving the command app.js ran and gave us the output “Hello World!“
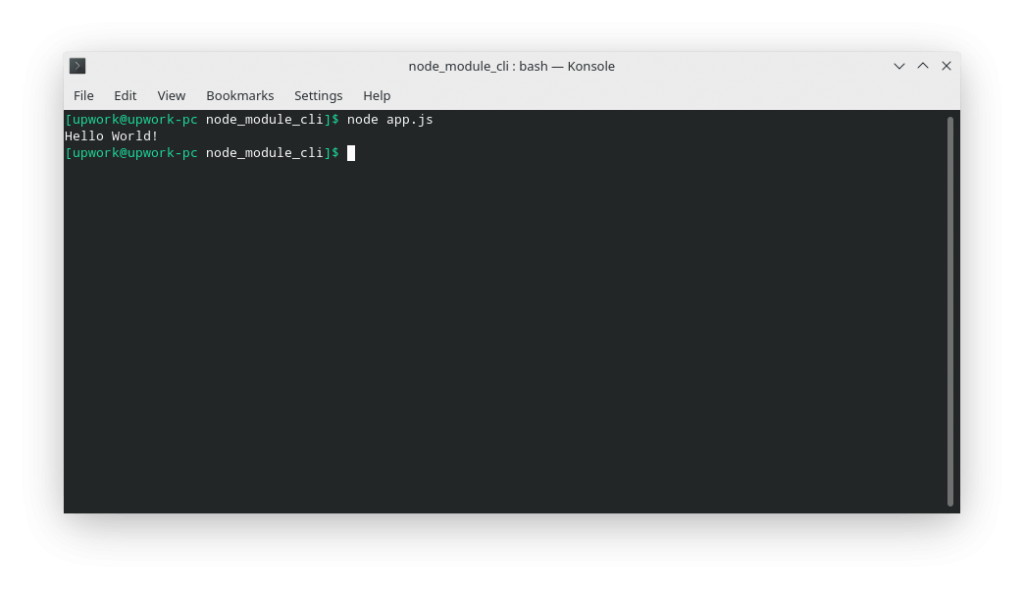
We have successfully run our first program.
Let us know a few things before coding again.
In the language of the node, each file in the application is called a “Module”. If a “variable” or “method” is defined in a file or module, then only that module can access them. The rest of the modules will not have any access to it in general. Because after defining “variables” or “methods” in a module, they are not in the global scope. For this reason, other files or modules usually do not have access to them.
Some of the “methods” in the global scope are console.log(), setTimeout(), SetInterval() etc. Since these are within the global scope, we can easily use these “methods” from any module or file. Now the question is, can’t we use things from one module to another?
Who says you can’t? Of course, you can, a thousand times. However, there are some rules and regulations of Node.js for this. Node.js has an Import and Export system that allows you to easily use things from one module to another.
So let’s see how the Import and Export system of the Node Module works.
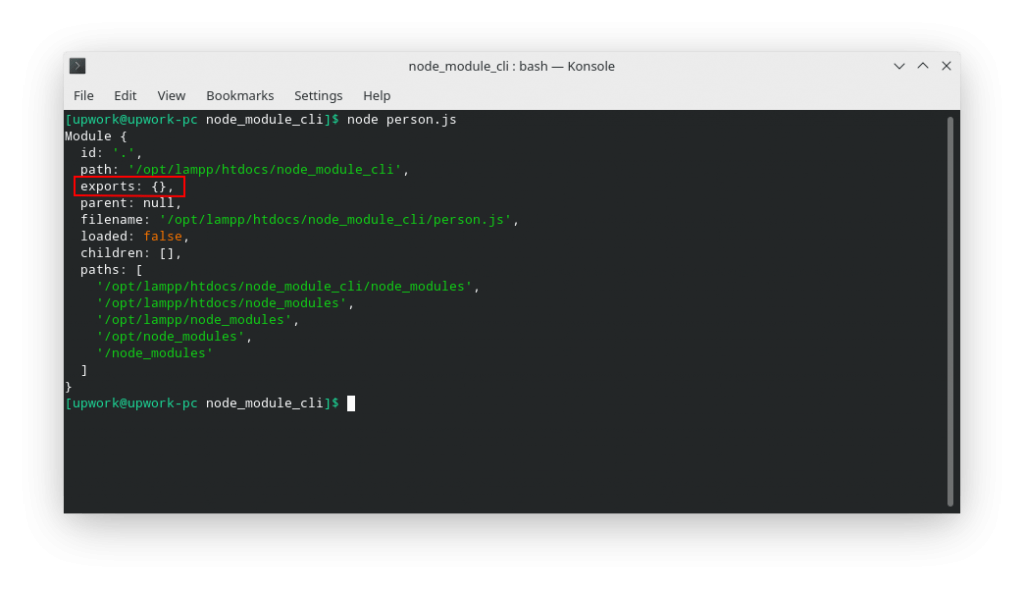
Now we will create another file in the Root folder named person.js.
Each file or module has its module object. Now we will see what is actually inside this Module object. This module object is an object of a global object, so we can access it from any file. To check what is in the module object, we need to make the module object console.log().
console.log( module );
Do you remember which command to use to run the file? Yes, that’s right, node (space) is the name of the file.
After running, you will see a lot of things, don’t be afraid, you just look at the Exports object, you don’t have to look at the rest for now. See the screenshot below.
What do you see? Now we can see that the data of the “person” object we created in the exports object has moved because we pushed the person object inside the module.exports object.
An empty object named exports was found in the module object. Now we will create an object named person in person.js.
const person = {
	name: 'John Joe',
	age: 40,
	username: 'john40'
}

module.exports = person;
console.log(module);
It is worth mentioning that we will use Modern JavaScript throughout this course, i.e. ES6, and ES7 Syntax.
Here, we first created a variable called the person and put some data as an object there. Then I pushed that person object into the exports object in the module. Then we did the module object console.log() again to see its current state.

What do you see? Now we can see that the data of the person object we created in the exports object has moved because we pushed the person object inside the module.exports object.
Now we get access to the data of this module from another module by using the Import keyword.
You can export anything, not just objects, such as methods, variables, etc.
We know how to export. This time we will look at how to use the exported data by importing it into another module or file.
We will now move back to app.js.
To import into Node.js, we have to call a method.
require ('module_name_or_filename_with_path_without_file_extension');
Notice the code below. Try to understand what is happening here.
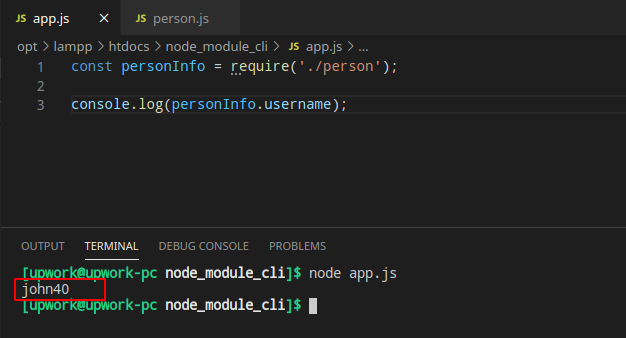
const personInfo = require ('./ person');
console.log (personInfo);
We have taken a variable named personInfo in the first of these two lines (you can use any name) and in that variable we have imported the person module. Since the two modules are in the same folder, we have explained with a ./ (dot slash) before the person that the current path or folder contains the module we need. Then I said the name of the module is “person”.
Now, in our personInfo variable, the data exported from the person module is gone. We checked the personInfo variable console.log() to check if the data came.
Now let’s see the output. Take a look at the screenshot below.
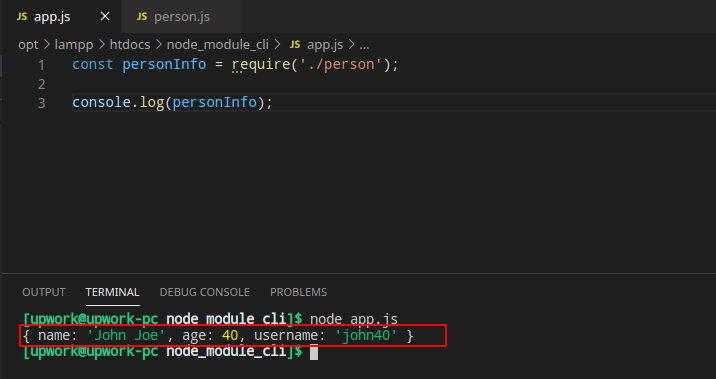
After running app.js, we get the output of the object that we created and exported in the person module. Now you understand what happened? Now we can use this object in this app module if we want. Remember, if you want to access another module, you must first import that particular module. And you already know how to import.
Now we want to access the username property of the person object. What do we have to do to get access to it now? We need help accessing the username property of the personInfo variable; Because it now contains the person object.
Take a look at the screenshot below.
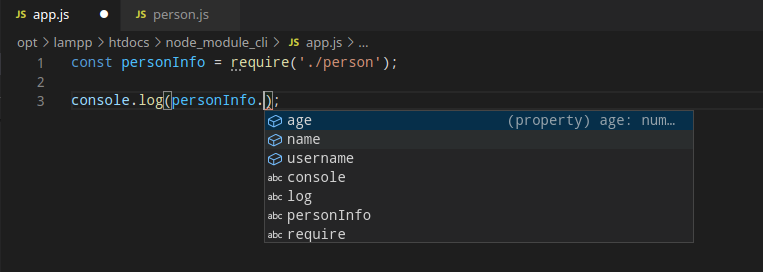
Using dot . (dot) with personInfo shows us through VSCode’s Intellisense, what properties it contains. Isn’t that funny?
Now if we run the app module, we will see the following output.
Now you must be able to access the rest of the property, right? Give it a try.
So today we learned about Node Module System! Now let’s find out why Node JS has this Modularity system and how it helps us.
Why Node Module System is Used?
Usually, when you define a variable or method in front-end or browser JavaScript, it is in the global state of the window object. As a result, it can be accessed from anywhere through the window object. There are some downsides to this. Suppose you define a variable named message in a file. Later you mistakenly defined another variable with the same name in another file!
What happens now?
By overwriting the data of the previous message, the current data will sit in the message variable, which will create many bugs in your project later.
To avoid this problem, the node contains the Node Module System. In the node, you can create methods, properties, objects, etc. with the same name inside different modules.
Although these names are one, they are different from each other, because they will not be in the global scope.
When you need to use the module of the thing you can use it without any kind of bugs or hassle.
Almost the same concept has been used in Object Oriented Programming.
There is a lot more to know about Node Module, we will know them in the next part. Next, we will learn to use the node’s built-in modules.
Throughout this course, we will go step by step and learn from Node JS Basic to Advance.
Leave Your Comment