If you have set up a web server using Xampp, or, compressing large amounts of files using WinRAR, may have noticed that disabling Windows Deference speeds up the web server’s response time or reduces compressing time.
I frequently need to disable Windows Deference temporarily on my PC powered by Windows 10 Professional. Among the ways I found on the Internet, I have written about two ways which are most easy and anyone can do it quickly.
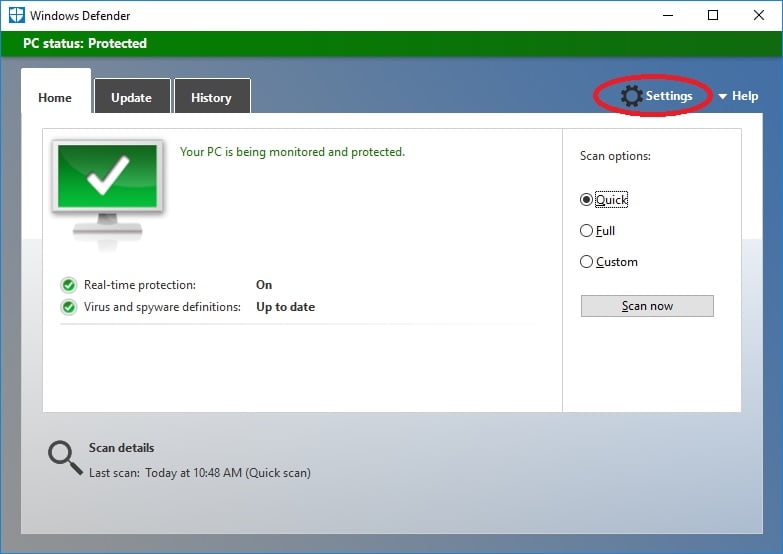
Windows Defender starts automatically with Windows, monitors my PC, and provides real-time protection against malicious viruses and malware.

Step 1 is the easiest and I used Window’s native graphical user interface to disable Windows Defender.
Step 2 uses Windows PowerShell, a text command-based terminal to automate tasks in Windows OS.
Let’s jump up and dive into it.
Method 1
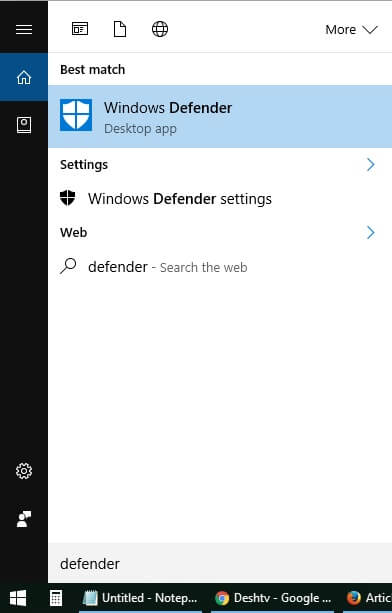
a) Press Windows Key and release, and type “defender”. You will see the “Windows Defender” entry in the search result. Right-click on it and click “Run as administrator”. Click on “Yes” when you are prompted to choose whether you want to run this app in elevated privilege. Windows Defender app will appear on the Desktop.
b) Click on the “Setting” button and you will see Windows Defender’s settings form. Under the “Real-time protection” section, there is an “On/Off” toggle switch. Click on it to switch Off the state. Close the Setting form by clicking on the cross button (X).


c) Now if you switch back to the Windows Defender app you will see a red-colored band on the top of the app shouting “PC status: At risk“. Thus, Windows Deference is turned off.

Method 2
a) Open up Windows PowerShell in administrator mode. To do it, just press and release Windows Key and start typing “PowerShell”. Windows PowerShell will show up in the search result. Right-click on it and choose “Run as administrator”. Press “Yes”

b) Execute the following command in the PowerShell terminal:
Set-MpPreference -DisableRealtimeMonitoring $true

c) An usual notification will appear warning me with a message below:

c) you will notice that Defender is now no longer monitoring in real-time.
d) To enable real-time monitoring in Windows Defender again, set the DisableRealTimeMonitoring back to false in the PowerShell terminal.
Set-MpPreference -DisableRealtimeMonitoring $false

Defender is very happy now taking the green color on its app window and will be providing real-time protection again.
How to disable Windows Defender permanently using Local Group Policy
Are you tired of disabling Windows Deference every day? Here is a process to disable it permanently in Windows 10 OS (Enterprise or Education versions) using Local Group Policy.
- Open the Run command using the Windows key + R keyboard shortcut.
- Type gpedit.msc and click OK to open the “Local Group Policy Editor”.
- From the left side panel under “Local Computer Policy”, expand the collapsible nodes and browse to the “Windows Defender” path:
Computer Configuration > Administrative Templates > Windows Components > Windows Defender
- On the right, double-click “Turn off Windows Defender”.

- Select “Enabled” to disable Windows Defender.
- Click Apply.
- Click OK.

Completing the above steps, Windows Defender will stop running, but the Windows System Tray icon for Windows Defender will be showing like it is still running. In this case, you simply restart your personal computer.
Once you complete the above steps, you will notice the Windows Defender shield icon will continue to run in the system tray. To get rid of the icon, simply restart your computer.
When you wish to re-enable Windows Defender, open Group Policy Editor using the “Run” command and take yourself to step 5 of the steps described above, select the “Not configured” option, click “Apply” and then “OK”. Wait a few moments and then restart your computer. This will re-enable Windows Defender again.
Important information about disabling Windows Defender on Microsoft Windows operating system
Windows Defender is the No. 1 antivirus on Windows 10, protecting more computers against viruses, malware, spyware, and other threats than any other solution. Windows Defender comes bundled with Windows 10. So, you do not need to purchase separate virus and malware protection systems. There is nothing to install, or, no hassle to configure it, no subscription needed and no nagware. It provides you with the following benefits:
- Virus protection and removal
- Malware protection and removal
- Spyware detection and removal
- Boot-time protection
- Real-time protection
- Cloud-based protection
- Network inspection
- FREE automatic updates
Windows Defender helps you protect your PC in two ways:
- Real-time protection system notifies you when any sort of threat tries to intrude on your system, or, whenever any app tries to change the important setting of your PC.
- On-demand scanning options. You can initiate a scanning on any part of your PC, or USB device. Windows Defender will automatically detect any threat, removes them, or, in some instances, sends any threat to a quarantine state.
Turning off Windows Defender’s real-time protection is a temporary measure (in case you do not forcibly disable it permanently), it will automatically turn real-time protection back on depending on Microsoft’s own algorithm, or, on the next system reboot.
For more information about Microsoft Windows Defender, browse Microsoft’s official page.
Leave Your Comment